Wednesday 15 December 2010

Final Product.


So here we go, after developing our original idea, re-shooting more footage, and advancing to another editing programe, we have finaly reached our final product. Watch and enjoy.


I am very please with how the final product came out. I am especialy pleased with the overall feel of the video, and how the story now relates to the lyrics and follows the conventions of a music video. Here are some of my favourite parts of the video.
I like them due to the composition, tones use of a shallow depth of field or the camera movement.

Friday 10 December 2010

2nd Day of filming.

Today went really well! We were lucky with the weather, as it matched our first shoot day perfectly, so during the editing, we would not have to do much post production to match the tones. We managed to collate enough footage to fill the one minute slot which we needed to fill. So now we just need to put it all together and smooth it all out and we will have our final product.

Thursday 9 December 2010

Re- casting

After storyboarding, we decided we needed to bring the "boyfriend" in to represent the break up. We decided my media partner Tom would step in to fill this role. I think they worked really well as an onscreen couple and played the role perfectly. They looked like an authentic couple, and due to their close friendship, were able to work really well together.

Tuesday 7 December 2010

Storyboard for 2nd shoot day.

So after deciding to film another lot of footage, we needed to decide what to shoot and how.

We decided that to give a story to the video, we should add in what happened before hand, in the lead up to her being in the woods. We decided the best way to do this is to film a break up, as that would bring in the link with the song, as some of the key lyrics in the song are;

" I gave you all I got, you wouldn't have it" and " You go your way and i go mine"

if we bring this connection in visualy, then it would be a more successfull products as that is a major convention of a music video.

We then sketched down some ideas for possible shots, and the order we want them to be in. Here is our hand drawn story board;

Monday 6 December 2010

Audience Feedback.

We showed the second draft to a few clasmates and teachers to see what they thought. Here are some of the responses we got.

" I don't understand? Who is she and why is she in a wood?"
" Where did the guitar come from?"
" Is she upset, or thinking?"
" Where is the link between the lyrics and the clips?"
" There are too many nature clips, they all need cutting down"

After receieveing this positive feedback, we decided it was neccersary to go out and film some more footage.  As we needed more narrative structure and interweaving storylines  to involve the audience more. So we organised another filming day and got to work planning our shots.

Sunday 5 December 2010

Second Draft


We moved our project over to Adobe premiere Pro, as this let us create a more professional product. This second edit also turned out better than the one we created on iMovie purely because we had more possibilities with the editing.

I feel this edit is better than the previous one also due to the composition, i believe we have stiched the clips together in a better order. But i'm still not 100% happy with it. I feel there is something missing. So i've decided to get some audience feedback, to see what the target audience think of the product.

Saturday 4 December 2010

Switching over to Premiere

Here are two screen shots, one of Premiere, and one of iMovie. As you can see iMovie is very simple and easy to use, where you have a window with all your footage, and a simple timeline where you can drag your clips into, where you can then alter, trim and manipulate. Where as Premier allows you to trim with much more precision, you can also alter the sound more precisely and accuratly.
In Premiere, it allows you to layer your footage ontop of each other, to create more effective blends and transitions and special effects. Where as this is not at all possible in iMovie.


As you can see, the difference between iMovie and Premier Pro is incredible. Below you can see in (1), all the different effects we could use on each clip in Premiere. All we would do is drag them onto the clips effects board (2) and then adjust till we are happy, above i have included the RGB curves tools, which is the one we used to make slight alterations to the colours.

As you can see in (4) iMovie has a very simplistic alteration tool, which is effective, but we wanted a very professional looking video. Premiere allowed us to do this with its multiple effects, which gave us as much manipulation power as photoshop does.

(1)

(2)


(3)


(4)


Friday 3 December 2010

My Ansillary Products; Final Advert Design

For My final Product I decided it would be best to have a Portraight version, as it would be easier to use in a magazine like the NME. So here is my final Design;


In my final development, i had to rearrange the images and text to fitj into an A4 portraight size page. I also blended a wet brush into the background to ad a vintage effect. I did this by lowering the opacity

My Ansillary Products; Development of Advert


Here is my favourtire design out of the four. I carried on developing it, by adjusting the colours of the image, changing the layout, adding an apprpriate record label logo and adding a release date.

My Ansillary Products; Advert Ideas

Here are 4 ideas for a possible Magazine advert which could appear in the NME or similar. I tried to create 4 completly different styles. I then got some audience feedback on my ideas, to help me discover what would go down well with its possible audience.

Tuesday 30 November 2010

First Draft of Music Video


Here is the first draft of the music video, the filming day went well, and got all the footage which we wanted to capture from our key shot story board. We put the edit together on iMovie 09.


I think that for a first draft it went really well, we were happy with the outcome as it gave us a good foundation to work on. We then sat down and analysed the video and set ourselves some targets and improvements for our second draft. We also showed our video to a possible audience, as we believe audience feedback is key in the development of our product.

My Ansillary Products; Final Back Cover Design

Here is my final Back cover design.

Back cover Development

Here are 4 ideas of possible back covers for my album, I changed the layout and font of the text, and used different blending tools to create a different effect. By blending the text into the background I managed to create a kind of mystical effect, one which suits the genre of music.


After Picking my favourite one I continued to explore different texts and blending options till I got the perfect cover. I also inserted some legal text at the bottom along with a barcode to add to the authenticity of the final product.

Monday 29 November 2010

My Ansillary Products; Final Front Cover Design

Here is My final Front Cover design.

Front Cover development.

Here are 4 Possible front covers for the album. I have kept them fairly simple, like the ones i have researched, as i believe this simple approach makes for a more attractive cover, and therefore would attract more attention with one striking image. Also after my research i discovered it Fits the genre of music perfectly. I used a classic Typewrite font and Georgia, which gives a classic feel to the cover, i also used the blending tools to make it more subtle and classic. I also positioned them either at the top or bottom, so it doesn't distract the audience from the eye catching image.

After picking my favourite one, i went on to adjust the positioning, fonts and colours, until i reached a final outcome which i was happy with. I picked this over the others as it is an emotive image and the colours work really wel together and compliment each other nicely.
Here is My final design for the front cover.

My Ansillary Products ; Photoshoot for CD cover


When we were out filming our second lot of footage for our Music video, we decided we would do our Photoshoot for our ansillary products there as well, as i think the setting we were in really suited the name of the album " What btter place than here" We used our model from the video, Leah, and i asked her to not give the camera eye contact, to add a distance between her and the audience, and to show that she is lost in thought, and that the location really means something to her and lets her think freely.
I took 120 Photos for the shoot, so I've cut the 12 out as the best suited for that of a CD front cover and reverse. I have edited and cropped them in Photoshop, to give the cold, crisp effect i was looking for. I'll then go on to experiment with text until i reach a final outcome.

Friday 19 November 2010

Conventions of a Music Video

Here i have analyised the band which have been of biggest influence to my production, Mumford and Sons, and broken it down to pick out what i believe are thekey conventions into making a successful music video...

Mumford & Sons; Ancillary Research.


Casting.

Here is Leah. She is a high school friend of ours, and has liked Chris's material in the past, so when we asked her to be our model, she jumped at the chance. As a fan of his music, and a representation of the Idealistic target audience, we decided she was perfect for the role.

Here you can she has a vintage feel to her attire. She is dressed in a pair of high waisted jeans, a pair of converse, a yellow knitted jumper and a white blouse, with a big fur jack and scalf. Instead of casting a specific wardrobe, we let her decide, as we thought it would be more authentic if she chose herself.

We are going to use her in our ancillary products as well, as she is very photogenic and would be a perfect model for that too. I also think that if she appears in all the products it will create a more professional feel to it.

Location.


We decided that we wanted to film in the natural environment, as it would be more artistic and calming, which was the effect we were looking for. Also at this time of year, the leaves are golden and falling from the trees and the low golden sunshine would create the perfect atmosphere for the genre of music.

There is woodland just around the corner of my house, with a stream and a valley running down the middle. We decided it would be a perfect location to shoot. It is also the same location we shot our Preliminary task.

We went out into the woodland, to find a suitable area to film. After a while of scouting through the wood, we came across a small clearing just off the beaten track. We decided it was perfect as it was fairly central so it would give the impression that it is shot in the middle of nowhere, in a mysterious location.
 

Here are a few stills to show the location we decided to film.

Filming.

We went out filming the other day together footage. We managed to collect a decent amount of footage, which we would be able to start creating our first drafts with.

Everything went just as we planned on the day; it was a cold sunny morning, which meant the lighting was perfect. Our Model turned up and we started shooting straight away. We used the key shots guide that we created, and then linked them together with other shots, of her or the natural environment. Now we just need to start the editing process...

Friday 22 October 2010

Storyboard.

Here we planned out several key shots which we are sure we are going to use, because these are the shots we had planned in our heads. We will add more shots in and around these shots, but they all depend on the weather and the surrounding as we're going to see what works and what doesn't.
We have run through what we want to happen and the way in which we will make it happen.
Key Shots
INTRO
Duration/  13 seconds
Description/ Camera pans around, various camera angles and shots. Just before end, Model enters. Rougghly 5 different shots.
Slugline/ Woods- Day
Camera Movement/Pan, Track, CU, LA , MS, LS
Figure Movement/ Shuffles feet through leaves.
Edits/ Cut edits.
Soundtrack/
-No Music at intro
-Diegetic sound of birds and running water.
-No Dialogue.

Shot 2
Duration/ 7 seconds
Description/ Leah moves feet through dried Autumn Leaves.
Slugline/ Woods - Day
Camera Movement/ HA Track along side feet.
Figure Movement/ Walking gently through leaves.
Edits/ Cut
Soundtrack/ "What better place than here - Chris Barratt"
Key shot
Duration/ 4 seconds
Description/  Bare feet in Water
Slugline/  River - Day
Camera Movement/  Fixed HA MCU on feet in water.
Figure Movement/ No movement.
Edits/  Cut
Soundtrack/  "What better place than here - Chris Barratt"
Key shot “You go your way and I'll go min”
Duration/ 4 seconds
Description/ Holding hands and then release with the lyrics.
Slugline/  Woods - Day
Camera Movement/  CU using selective focusing on hand.
Figure Movement/ Release grip after 2 seconds.
Edits/  Cut
Soundtrack/  "What better place than here - Chris Barratt"

Key shot “And what better time than now”
Duration/ 4 seconds
Description/  Pocket watch swinging around neck-
Slugline/  Woods - Day
Camera Movement/  MCU on chest
Figure Movement/ Walking
Edits/  Cut
Soundtrack/  "What better place than here - Chris Barratt"

Key shot
Duration/ 4 seconds
Description/ sat on chair on the other side of the river, facing the other way (enigma) Acoustice guitar propped up next to the chair.
Slugline/  Riverside - Day
Camera Movement/  LS fixed
Figure Movement/ Sat still, looking at pocket watch.
Edits/  Cut
Soundtrack/  "What better place than here - Chris Barratt"

Key shot
Duration/ 4 seconds
Description/ Umbrella dropped open upside down in the river and begins to drift down it.
Slugline/ Riverside - Day
Camera Movement/ Pan as the umbrella passes it then MS to LS as the umbrella gets further away
Figure Movement/ No figure
Edits/  Cut
Soundtrack/  "What better place than here - Chris Barratt"

Key shot
Duration/ 4 seconds
Description/ silhouette of Leah’s head
Slugline/ Woods - Day
Camera Movement/  No movement, MCU LA.
Figure Movement/ No movement
Edits/  CUt
Soundtrack/  "What better place than here - Chris Barratt"

Here we sketched out some ideas of the shots and how we wanted them to look;

Friday 15 October 2010

The song.

Our Song is "What better place than here - Chris Barratt"

The lyrics are

"

It's not that easy being true to yourself
It's not that easy when you're getting older
It's not that easy being true to yourself
They grey hairs on your head in the mirror

You go your way and I'll go mine
What better place than here
And what better time than now

It's not that easy being true to yourself
You can't deny that you take advantage
It's not that easy being true to yourself
I gave you all I got, you wouldn't have it"
 
and here is the demo recording of the track
 
(insert track here)

Lights, Camera, Action!

Now we've done our research, it's time to start our final Product.

We have our Scheduled Shoot date for the 25/10/2010. As this is during half term, we are planning on making a day of it, as this will help with the continuity and give it the realism we are looking for. By setting the date 10 days in advance, gives us time to storyboard, get our props together, and get everything arranged for the day of filming.

My friend sent me the Demo recording of the track we are using last night, so now we can start storyboarding our final video using the Lyrics from the song. I was really happy with the demo, as it is exactly the kind of song i was looking for. It suits the genre of video i want to create and sets the right mood. Also, Leah, our model, fits perfectly into this style of music.

So now we have to get on with the planning!

One Autumn Day. Written Analysis of the Production.

After doing some research into the genre of music video in which I would like to create, we decided to go out and create a small video to practise using the camera, and experimenting with different camera angles, lighting, framing and composition. We did a purely narrative video as our model was not available for filming the day we needed to shoot. We decided to use nature as the subject, as it is very lyrical and very photogenic.

All day it had been raining, and we had travelled up to our other location, but the weather was too
 bad to shoot, so we returned home and that’s when the weather started to improve. With water still on the ground, but the sun was starting to peep through, we decided it was perfect weather, and we grabbed our cameras and headed straight down to the woods.

We started with a LA shot looking up through the canopy of the tress, as the sun peered through after a day of rain. We decided to use this as the orange evening sun looked beautiful as it shone through the autumn leaves hanging in the trees. I particularly like the lens glare which was created, as I think it really suits the artistic style of the video. Colours are very important to us, that’s why we are choosing to shoot it in a very rural location, so we can get the colours we desire. We want a very neutral colour scheme, and if needs be, we can enhance this in post production.

We then cut to a CU shot of the grass as the light was shimmering off the water which had been left by the rain, this creates the tranquil effect we were looking to create in our video.
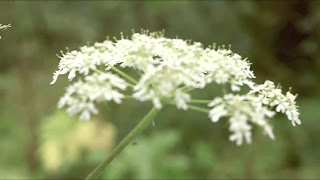
Shot with 50mm f1.8
We then cut to a CU of a flower which is framed perfectly in the centre which is exaggerated through the selective focusing used. We were able to create this because we used a 50mm f1.8 Lense on my DSLR, and with the manual focus setting allowed us to get the pull focus and selective focusing which I have used throughout the video. This is a particular favourite shot of mine as I love how it moves gently with the wind and in time with the gentle music which is playing over the top.

We then cut to a LA pan around to the left through the long blades of grass, which continue the same atmosphere which was set by the previous grass shot. Throughout the video there is a low level of natural light which adds to the continuity of the overall product. The natural light adds to the MES as it helps create the calm, peaceful atmosphere we were looking for.

We then go on to cut to a hand held shot which gives the POV of walking through the long grass as it tracks slowly forwards. We then use a montage of fixed shots. We decided that the fixed shots and slow pans work well with the gentle music, compared to jerky, fast pans which would suit a more erratic song. We used a series of HA shots, and used selective focusing to really emphasise the detail of the bark on the trees and the beauty of the canopy.
We then cut to a LS of the forest, with a bush in the background. We then used manual  focusing to do a pull focus and selectively frame a branch in the foreground. Focusing played a massive role in the production of our short film, as we used depth of field to our advantage as we can select a certain subject and frame it perfectly.


We then continued to montage our footage in time with the music to create a smooth flowing rhythm. Each shot was manually focused with natural light. We occasionally made the subject out of focus to draw attention to it. We used different camera angles such as birds eye view, HA, LA and ES.
At 0:40 seconds we did a HA shot onto the flowing river, we then cut to a CU of the mini waves in the water, as this is a technique we wish to use in our final product.  This shot represents the weather and time of year perfectly. Also the merky brown water is perfect, as we want a very neutral colour scheme of greens, white and browns in our final product,  A very natural style.

Use of Selective focusing.
The next shot of the leaves is a perfect example of the selective focusing we used. With a CU of a leaf in the foreground, We slowly shift the focus down the branch, until it is focused on the background of the bush. This shot was a great success as the natural light really emphasises the colours, which is an important part of the video. The next shot is a continuation as we the cut to another leaf on the same bush, which had been eaten by an insect, and had water running off it. We framed this in the centre of the shot in a CU of the leaf. We used the manual focus and depth of field to our advantage again, as it really exaggerates the details on the leaves.

After this the music picks up, and we used the droplets landing in the water to increase the tempo of the footage. We used a Bird’s eye view shot so the ripples stand out and spread from the centre in a mesmerizing way. We then cut to a HA CU of the droplet landing in the water, we slowed down this clip ever so slightly to exaggerate the droplet hitting the water. As the Music picks up the pace, we cut to a HA CU looking down a small stream, and then every time the music has an accented beat, we cut to a different shot. We then move to a LA MCU looking up the same stream. And then a HA LS looking down another stream. This montage of streams shows the weather and what it has done to the landscape. It also adds to the continuity as the whole video was shot within 45 minutes, so the weather and the water on the ground doesn’t change throughout. We then finaly cut to a Knee height LS of the main stream which runs through the location. We then cut to a Long pan to the left, which is used as an Establishing shot, as it shows the whole location.

As we made this video, we discovered there were several things we would have to improve. First of all, we didn’t use a tripod. This was due to the bad weather. But for the final product we will use a Tripod for all shots. As this will give us a more stable shot and a more professional feel to it. We will also storyboard the final product. As this was just a practise edit with no actors in them, we didn’t feel the need to plan it down to the last detail, but for the final product, we will plan everything from the movement of the actress, to what is framed within the shot. We would also us more than one camera, as this allows us to catch the action from several angles at the same time. We will also incorporate props into our final piece. We will decide what props are necessary when storyboarding our final video.

The things we are going to take away from this practise edit, as we feel it was successful, is the use of several camera angles. As this creates a dynamic feel to it. We will also film on the same day, to get the same feeling of continuity as we did in a practice video.

Friday 8 October 2010

One Autumn Day. Screenshot Breakdown.


One Autumn Day

This Weekend we decided to go out and film a practice edit. This would give us an idea of location and shot angles. We we're intending to using our model which we will use in our final product, but unfortunatley she had to work. The weather wasn't on our side but we decided to go out and shoot anyway, so we ventured down the road to Carrwood Wood in Bramhall and by the time we got their, the rain eased and the sun peaked through the trees. We were able to get various shots and angles, which would give us good inspiration for our final piece. So here it is, i'm now going to break it down into stills and analyse each shot.


The Lost Mystical Analysis.

Here is the analysation of " The Lost Mystical". I like this video purely because of the Stop motions and contrasting lighting effects used. I wish to incorprate a stop motion into my final music video as i believe it would suit a fast paced part of the song really well. I chose to look into this video as I am really a fan of “Mutiny Bikes” media productions as they have previously created some other very professionally edited DVD’s. This video is a small video which uses outtakes of the Final Product, “ Lets get Mystical”.
Below i have broken down the titles into screen shots and commented on some of the techniques used.


It starts with a Master shot Stop motion of Cars driving down the main street of a city. I like the use of the low level lighting as it exaggerates the lights in the buildings and in the cars. it then cuts to a ELS of the water’s edge at dusk. The low sun lighting gives it a peaceful feel to it and sets the mood for the rest of the video. It then cuts to a CU of a Birds corpse and the use of selective focus really frames it in the centre of the screen. The use of low lux natural light gives this shot an eary feel to it which contrasts from the previous shot. It then cuts to another stop motion of a LA shot of a church tower clock. The low lighting really emphasises the clock. Then their is a montage of stop motions as the music picks up.

Throughout the edit, the only use cuts, as it suits the music and makes the overall product flow better. All the shots are a fixed shot apart from one small pan. The use of fixed long shots really sets the MES for the rest of the video, so the audience is aware of the surroundings of the video.

All the sound is Non Diegetic, which works really well as the soundtrack really stands out and works in harmony with the footage.

Mutiny Bikes - The Lost Mystical


I have decided to use this BMX video as a source of research, although it is completly irrelavant in terms of being a bmx video, the editing is very similar in style to which i wish to accomplish when creating my music video. I love the use of selective focusing, the music genre and the angles and lighting which they use throughout. I am focusing only on the titles as the footage is mainly unrelated to bmx, and it is a narrative which could be used in my music video.

I am now going to break down the part of the video which i have taken inspirationn from.

Audience Research

I decided it was nessercary to look into my audience. I created a mood board of all the possible interests of my demographic.

Here is a possible Audience Profile for who i am aiming my product at;

Age Range: 16-30
Music Taste: Rock, Acoustic, Alternative.
Interests: Live Music, Festivals, Ipod, Fashion, Social Networking, Going out with friends.

My audience would be someone who lives music and can appreciate it in its simplest form. They like slow paced music and appreciate the Art behind music. They will also really be into how the video looks and can appreciate the artistic nature of the video.

To confirm my Audience Profile, I played the song to 10 people who fit into my target audience, and asked them to comment on what kind of video they can imagine fitting to the song. Here are my results.


Friday 24 September 2010

Mumford and Sons - Gentlemen of the Road ( Mini Documentary) Screenshot breakdown.


Mystery Jets - You Can't Fool Me Dennis


I like the use of props in this video and the way the instruments appear in the video, so the audience can relate to the video more. I Also like their use of chairs. I might incorporate this into my video as it is quite a relaxed song and would suit a laid back video to go with it.

Florence and the Machine - Dog Days Are Over


I selected this video purely because the rural location and the colour tones and the same as the ones I want to use in my video. Depending on the weather, we may have to edit this in post production to get the effect we are looking for. As for the location, we have found a possible location which is easily assessable to us.

Bombay Bicycle Club - Rinse Me Down


This video is very simple. I like the use of focusing throughout the video and the colour tones used. I am going to film my video with a 50mm lens, which allows me to get an aperture of f1.8. This allows me to get a very deep depth of field, which gives the blured background and focused forground. With Manual focus, i will be able to selectivley pick out the parts of the shot i want in focus.

Bombay Bicycle Club - Flaws


This video is very simple, but i like it. I like the use of handheld camera and there shifting in focus, which allows them to frame their characters perfectly. I also like the bleeching of colour to give that vintage feel which is in most of the videos which I have re searched. I also like the use of props. I may introduce a Prop into my video like an acoustice guitar or a chair.

1000 years - The Coral


I like the use of colour they have used in this video, it gives it a sunny, vintage feel to it. Which I believe creates a positive feel to the video as it is more uplifting. I also like the way they do simple shots, like a fixed LS of the band playing, i think it is very effective, and is the kind of shot I might use in my final production.

Monday 20 September 2010

Newton Faulkner - To The Light


I like the use of only one character/singer in the video, and the use of rural locations for shooting. I think it creates a calmer feel, one in which I think is nessercary for the kind of music which we are composing a video for.

Temper Trap - Love Lost


In this video, i like the use of low saturation, as it makes the video feel cold and depressing. In my own video, i will look into post production editing, as it will allow me to completly change the feeling of the video by altering the colours and saturation in post production.

Mumford + Sons - Little Lion Man

Bombay Bicycle Club - Dust on the Ground

I like this video beacue of the location and setting, it's the kind of rural backdrop i am thinking about using in my own music video. I also like the use of Slow tracks and pans as it gives a very calm feeling to the video. I also used it to generate ideas for props and costume.